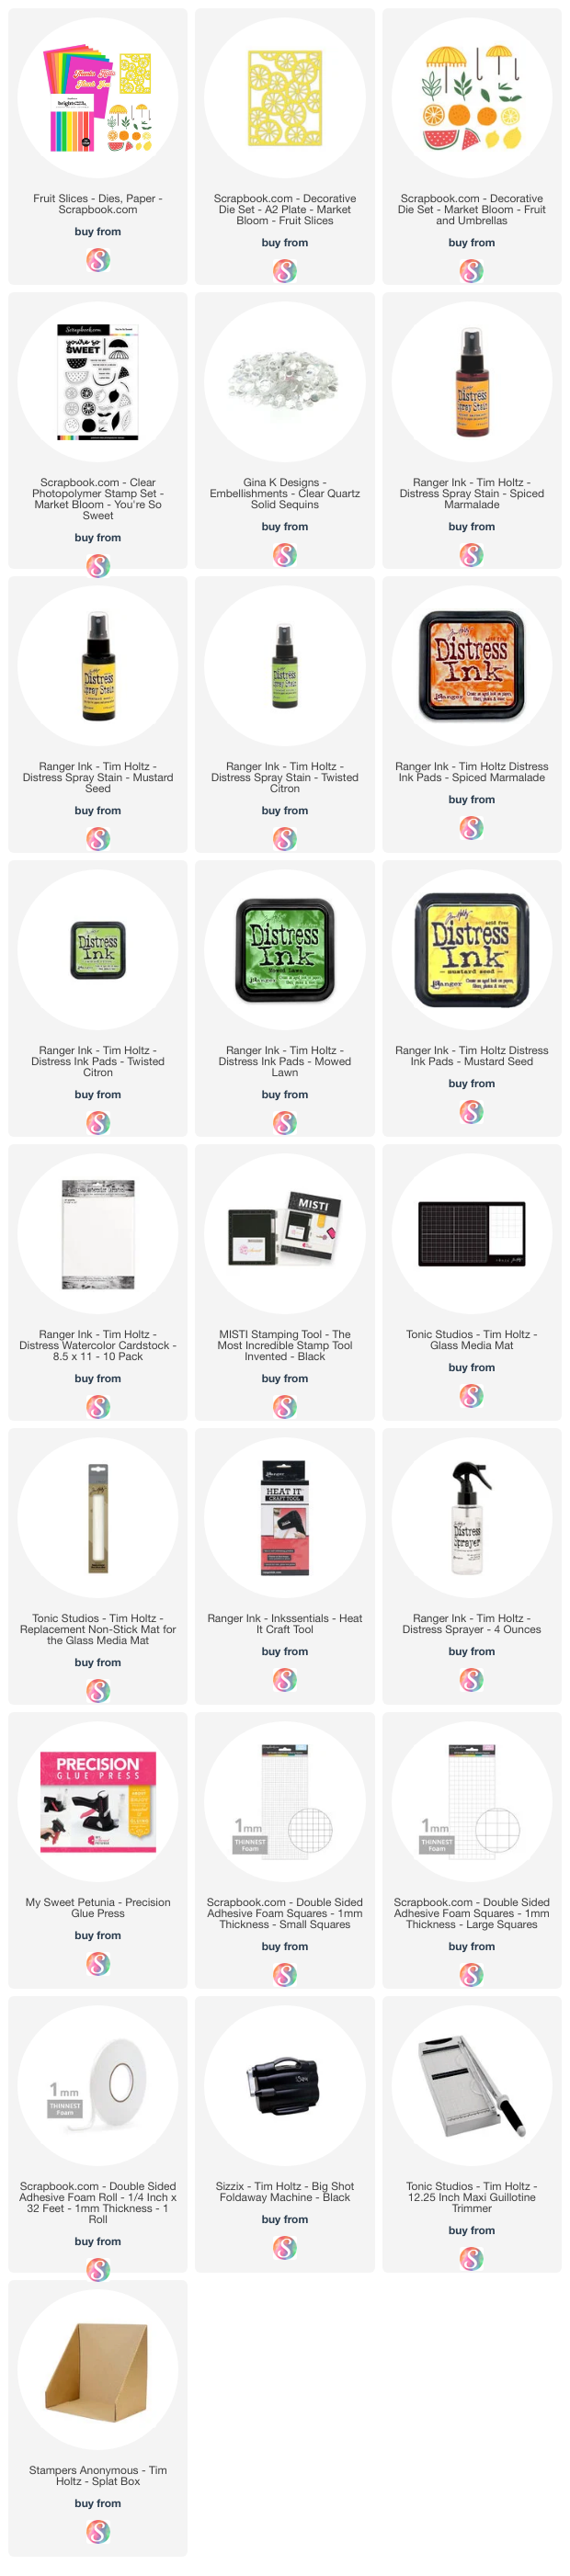
November 23, 2009

Christmas Ornaments!!!

Today I wanted to share with you 2 Christmas ornaments I recently created! They are both created using Bo Bunny's St. Nick line and the first one also uses some Magistical Memories chipboard.
"All Hearts" Ornament
Supplies:
Patterned Paper: Bo Bunny St. Nick Sugar Plum and St. Nick Stocking
Embellishments: Bo Bunny St. Nick Home for the Holidays Cardstock Stickers and Holly Berry iCandy Jewels; Red ribbon; Gold cord
Chipboard: Magistical Memories Fancy Frame (2)
You will need 2 of the fancy inside shape and one fancy frame one size larger than the shapes.

Instructions:
  1. Color the larger frame and the 2 smaller inside shapes with a gold krylon pen.
  2. Attach the "All hearts" sticker to the front of one of the fancy shapes.
  3. Hand cut a shape similar to the sticker in green and attach it to the back of the other shape.
  4. Cut 2 shapes out of red paper slightly larger than the fancy shapes and attach these to the back of each fancy shape.
  5. Punch a hole in the center at the top and bottom of the larger frame.
  6. Cut a 6 inch length of gold cord and run it through the holes in the frame and then sandwich in between the other two shapes. (I used double sided adhesive tape to hold it in place.)
  7. Glue the two fancy shapes together.
  8. Tie a 6 inch length of gold cord through the top hole on the frame.
  9. Finish by adding a small red bow and a red gem to the heart.

For my second ornament I used a fun tutorial I found on the internet. Unfortunately, I was unable to locate the original tutorial, so I have attempted to re-create the instructions for you.


"Glitter Star" Ornament
Supplies:
Patterned Paper: Bo Bunny St. Nick Stocking and St. Nick
Embellishements: Bo Bunny Holly Berry iCandy Jewels and St. Nick Flowers
Other: Red glitter glue
Punches: Stampin' Up!

Instructions:
  1. Start with a square of patterned paper 3 inches by 3 inches. (You will need 6 of these.)
  2. Fold it in half to form a triangle then fold that triangle in half to form a smaller triangle.
  3. Cut 3 slits, being careful not to cut through the middle.
  4. Open your paper.
  5. Start in the center of the cut pieces. Curl them inward and slightly overlap them. Add glue to the overlapped area to hold them together.
  6. Repeat this with the next two cut pieces, however do it on the opposite side of the first one.
  7. Repeat this process 2 more times, alternating which side you curl them.
  8. Repeat steps1-7 to create 6 of these shapes.
  9. Attach them together one by one using a hot glue gun until you create a star/flower shape.
  10. Finish by embellishing the center as you wish.
Thanks for stopping by!

November 17, 2009

Dear Santa!!!

Today on the Bo Bunny blog I am sharing 3 different ways to use the Bo Bunny Dear Santa stamp. From the first time I saw this stamp, I knew it would be the perfect stamp to use for creating my Christmas cards this year. I love anything Santa and I have included stamping on my Christmas cards for years!

Here are the cards I created! For more info and detailed instructions stop by the Bo Bunny blog!


Thanks for stopping by!!!!

November 16, 2009

Thankful for YOU!!!

There are so many ways to say thank you, but this month the Bo Bunny DT was challenged to create a gift that would be a unique way of showing thanks. Not some simple thank you cards here, but something that would be a little more out of the ordinary and different. Well, my mind got to thinking, and I remembered receiving a cookie mix in a jar from my mother one year and thought..."Hey! This would make a great thank you gift!" For me, food is always a great way to say "Thanks!". It's simple, easy to use and it doesn't take up much space! With these thoughts in mind I started searching online for the perfect recipe. After a bit of searching, I found what I was looking for...Sand Art Brownies! Brownies! You gotta love brownies!!! And yes, they are really good! Taste tested and 100% satisfaction guaranteed! LOL!!! So here's how you do it...

"Mixed with Love" - Brownie mix jar
I decorated the outside of a quart jar using Bo Bunny's Kitchen Spice line. I also created a coordinating card that contains a Kitchen Spice recipe card. On the front of the recipe card I wrote the directions on how to use the mix and on the back of the card I wrote the directions and ingredients so they can either make their own Brownie mix jar gift or recreate the recipe. The recipe card is attached to the inside of the card with photo corners so that it can be easily removed and added to a recipe box.

Supplies:
Patterned Paper: Kitchen Spice Allspice, Kitchen Spice Sesame, Kitchen Spice Cloves, Kitchen Spice Ginger, Kitchen Recipe Cards Cut Outs
Cardstock: Double Dot Chocolate Dot and Wildberry Dot
Ribbon: Double Dot Chocolate
Stickers: Lovin' from the Oven


Instructions:
Mix ingredients in a wide mouth quart size jar.

Ingredients:
5/8 cup all-purpose flour
3/4 teaspoon salt
1/3 cup unsweetened cocoa powder
1/2 cup all-purpose flour
2/3 cup packed brown sugar
2/3 cup white sugar
1 cup semisweet chocolate chips
1/2 cup walnuts

Directions:
Mix the 5/8 cup of flour with the salt. In a clean wide mouth 1 quart jar, layer the ingredients in the order given. Start with the flour and salt mixture and end with the walnuts.

Make sure to include the following directions with your jar on either a tag or like I did.
Sand Art Brownies
1. Preheat oven to 350 degrees F. Grease one 9 x9 inch square baking pan.
2. Pour contents of the jar into a large bowl and mix well.
3. Stir in 1 teaspoon vanilla, 2/3 cup vegetable oil, and 3 eggs. Beat until just combined.
4. Pour the batter into the prepared pan and bake in the preheated oven for 25 to 30 minutes.

(Recipe taken from All Recipes.com.)

Stop by the Bo Bunny blog to see what the rest of the DT created! You are sure to be inspired!!!
Thank you for your visit and to THANK YOU for being YOU, I am going to do another give away. This time it will include some random scrappy goodies...some old and some new! All you have to do is leave a comment telling me what you are thankful for! Post your comment before 12PM on 11/26/09 to be included in a random drawing! And thanks again for stopping by!

November 6, 2009

Get a jump on Christmas...

on your Christmas cards that is, with the card sketch posted on the Bo Bunny blog! Yours truly created this sketch for the Bo Bunny DT and you to play with! Stop by the Bo Bunny blog to see how the other DT members where inspired by the sketch! I hope you are inspired by it and I would love to see what you create!

Here's the sketch:


Here's my take on it:


Supplies:
Patterned Paper: Tis the Season, Tis the Season Deck the Halls, Tis the Season Stripe
Embellishments: Tis the Season Buttons & Bling
Cardstock: Double Dot Coffee Dot, Double Dot Wasabi Dot
Ribbon: Double Dot Sage Ribbon


Designer tip:
I added dots with a white gel pen to the dots on the Wasabi Dot Christmas tree.

Thanks for stopping by!

October 28, 2009

The Boo Crew is in the House!

It's Halloween! It's Halloween!
The moon is full and bright
And we shall see what can't be seen,
On any other night.
Skeletons and ghosts and ghouls,
Grinning goblins fighting duels,
Werewolves rising from their tombs,
Witches on their magic brooms.
In masks and gown we haunt the street
And knock on doors for trick or treat
Tonight we are the king and queen,
For oh tonight it's Halloween!
-Jack Prelutsky


Halloween
...it is definitely one of my favorite holidays! I think it mostly has to do with the colors...I simply love orange, purple and green and the Boo Crew line by Bo Bunny has filled me with happiness and inspiration because of it's fun colors and designs! It is definitely one of my favorite lines ( at least for the moment! LOL!!!!) and I have had so much fun playing and creating with it!

Today I want to share this fun little haunted house that I created using the Boo Crew line, 2 wooden haunted house shapes (I found these at Hobby Lobby) and chipboard. You can also make your own template or download one off the internet, cut it out of cardboard or chipboard - just make sure that the material you cut it out of is strong enough to stand vertically without bending. For the supply list and detailed instructions on how I created this project keep scrolling!


Supplies
Patterned Paper:
Boo Crew Dot ( black dot used for the outside of the house and the green used for the door), Boo Crew Here's Looking at You (used for inside the windows and door), Boo Crew Masquerade and Goblins (used for the roof), Boo Crew Ghoul Friends (cut out the characters, jack o'lanterns, spider and ghosts), Boo Crew Stripe (used for the grass).
Stickers:
Boo Crew Time for Treats (cut out the Beware sign)

Instructions
1. Take two wooden house shapes, sand the edges and spray paint them black.

2. Cut off the fence on one of the houses and discard. The house with the fence removed is the back of your house.
3. Cover what will be the front of your house and the back of your house with patterned paper.
4. Ink all edges of the patterned paper with black ink or carefully run a black sharpie marker along the edges.
5. Cover the inside of the house (the part that will be the inside of the house) with the orange paper so that the orange shows through the windows and open door.
6. Use chipboard to create the side walls, roof , open door and the stairs for your haunted house.

Creating the side walls
7. Measure the length of each wall (its vertical length when the house is standing), as indicated in the photo below. Cut chipboard this length by 5 inches wide. Score a ½ inch in on each end so that the piece is now 4 inches wide (This is the distance between the front and the back of the house). Repeat this for every wall: cut 5 inches long by the distance of the wall height. (You will hot glue the folded 1/2 inch section on each piece to the wooden house to create your side walls.)


8. Cover the walls with patterned paper.
9. Ink the edges with black ink and set them to the side.

Creating the roof
10. Measure the length (actually the height) of each roof as indicated in the photo below.
11. Cut them to be 5 inches in length
11. Use masking tape to bind the 2 roof sides to each other. (The masking tape will be running along the peak of the roof.)
12. Cover each side of the roof with strips of patterned paper. I used an embossing punch to create my strips.
13. Ink the edges if you wish and set them to the side.


14. Attach the walls first to the wooden house shapes using a hot glue gun. Start by attaching them all on one wooden shape and then attach them to the other shape. I also recommend starting at the bottom and working your way toward the top. Here are several views to give you an idea of what I mean.


15. Next attach the roofs using the hot glue gun.
16. Finally, finish by decorating the house with your choice of embellishments such as stickers, cut outs from the patterned paper, glitter, gems etc.

I hope you have fun creating your own haunted house! And if you do create one, I would love it if you would share it with me!!!

Thanks for stopping by and I hope you all have a Happy Halloween!

October 27, 2009

Flutter Butter Butterfly

I have a few scrappy projects to share with you today! The first one I want to share with you is an altered project I created using Bo Bunny's Flutter Butter line. I just love the combination of colors in this line and the chocolate brown offers such a wonderful contrast to the blues and greens! The paper line name (Flutter Butter) and of course the adorable butterfly design on the papers inspired me to pull out this butterfly "skeleton" puzzle I purchased awhile ago at Michael's. It seemed to me to be a perfect match for an altered project! I then created a bed of paper roses for it to sit among!

I created the roses using a tutorial by Maria Holder. I used my Silhouette to cut out the flower shapes and then followed her tutorial on how to create the roses. They are very simple to make and I think they add a nice touch! After creating these, I have been on the search for other flower designs and realized that the Silhouette has several different 3D flowers available!!! More fun for the future! LOL!!!


How to alter wooden projects:
Sand the wooden pieces.
Paint the pieces, especially the edges, a color similar to the paper you are going to cover it with.
Glue the pattern paper to the wooden piece.
Cut around each wooden piece using an x-acto knife to remove the excess paper.
Sand the paper edges with a fine grit sand paper.
Ink the edges if desired.

(butterfly size: 10.5 inches x 13 inches)

If you are looking for more inspiration, stop by the Bo Bunny blog to see what the other DT members created using Flutter Butter!

I also have my October reveal article for ACOT posted today! This month I worked with Sassafras Lass's Amplify line! I found it a bit challenging to start with...the colors and designs are bit out of my comfort zone! However, after taking a step back and a deep breath, I was able to step outside the box and have some fun with their products! Feel free to top by ACOT for my full article along with more close up images of my layouts!


Thanks for stopping by and be on the lookout tomorrow for a some fun Halloween inspiration!!!

October 21, 2009

October Contests & Challenges at Magistical Memories!

Today I am sharing my October Magistical Memories projects with you!


For my first project, I used the Scallop Lace Book to create this fun little Halloween treat bag. I cut 2 of the pages to the same height and then cut the sides and a bottom from chipboard. I used masking tape to hold all of the pieces together. I painted the inside and outside of the bag black. I then covered each side of the bag with pieces of pattern paper, stickers and glitter. I finished by filling it with some yummy Halloween peanut M&M's!!!


My second project was created for the October contest. For this months contest you are to create a Halloween or harvest themed card. I created my card using the Nesting Circles. I covered them with patterned paper and used them along with some foam tape to give more dimension to the cardstock sticker.


My third and final project that I am sharing today was created for the October challenge. For this months challenge you are to use a tic-tac-toe grid as inspiration. I chose to use the actual grid design as my source of inspiration and I used this to determine how to place my photos in my photo collage. I used the Baseball player silhouette on this LO and I painted it red and then covered it with red glitter glue.


You still have plenty of time to enter your creations for the October Challenge and Contest for a chance to win some free Magistical Memories chippies!!!

Thanks for stopping by!!!